Monday, January 16, 2017

Onigiri. Or "doughnuts", according to Pokemon.

My kids have recently gotten into watching Pokemon on Netflix! When it first came out back in the day, I was about 13 years old and just slightly too old to get into it. However, my younger siblings all became obsessed with the whole franchise: the show, the game, the cards, everything. Now that my kids are watching it, it's been so much fun to see them enjoying it, and fun to see some of what I missed.

The other day, I sat and watched an episode with my boys. The characters were eating a picnic lunch, and raving about the doughnuts they were eating. Brock was all like, "I especially love the jelly-filled ones!" or something like that.

Donuts.png (640×480)
(image courtesy of http://bulbapedia.bulbagarden.net/wiki/File:Donuts.png)

 I had to laugh. Because what they were eating was clearly NOT doughnuts: it was onigiri, a type of Japanese snack. Onigiri are basically balls of rice, often stuffed with fish or vegetables, and topped with a strip of seaweed and sesame seeds. I REALLY don't think you'd want to stuff them with jelly. :P I wonder why they decided to translate "onigiri" as "doughnuts" and not just "rice balls" or something more accurate.

In any case, it had been a long time since I'd thought about onigiri. I'd had them a couple of times before. The first time, I was a freshman in college. A bunch of my classmates and I met up at the house of one of our Japanese TA's to plan for a skit we would perform for the Japanese department's bunkasai (cultural festival). Our TA was a native Japanese, and while we were at her house we all helped make some onigiri. If I remember correctly, I think the rice had been cooked in chicken broth and there were cooked carrots in it. They were delicious!

I tried making onigiri again at home a few years later, but I don't remember much about it.

Anyway, after seeing those "doughnuts" on Pokemon I decided I wanted to try making them again! I looked up a couple of recipes, and using those as a reference, I gave it a try.

First, I bought some rice. One recipe I read said to use short grain rice, and another said to use medium grain. I bought a bag of medium grain. I measured out a cup of the dry rice, poured it into a fine mesh strainer, rinsed it under the water till the water ran clear, then dumped the washed rice into my rice cooker with two cups of water. Then pushed "cook" and waited a while. :)


In the meantime, I got the rest of the ingredients together. I found nori (seaweed) at the store that came in big sheets, used for making sushi rolls. I used some clean kitchen shears and cut one sheet into several strips, approximately 1" by 4" each.


For fillings, I had some tuna, some salmon (which turned out to be lemon-pepper flavored; I wasn't paying close enough attention at the store! It turned out good though), small chunks of cream cheese, and some sesame seeds.


Once the rice was finished cooking, I dumped it into a bowl. I shook a little (maybe a couple teaspoons' worth) of rice vinegar onto it, for flavor, then fluffed the rice.


Next came the fun part. Time to play with my food! I poured some salt onto a plate and added warm water. Before handling the rice, I dipped my hands into the salt water to help keep the rice from sticking. (And it really worked; I forgot one time and the rice stuck to me, well, like white on rice *ta-dum-ch!*) After dunking my hands, I filled my palm with warm rice.
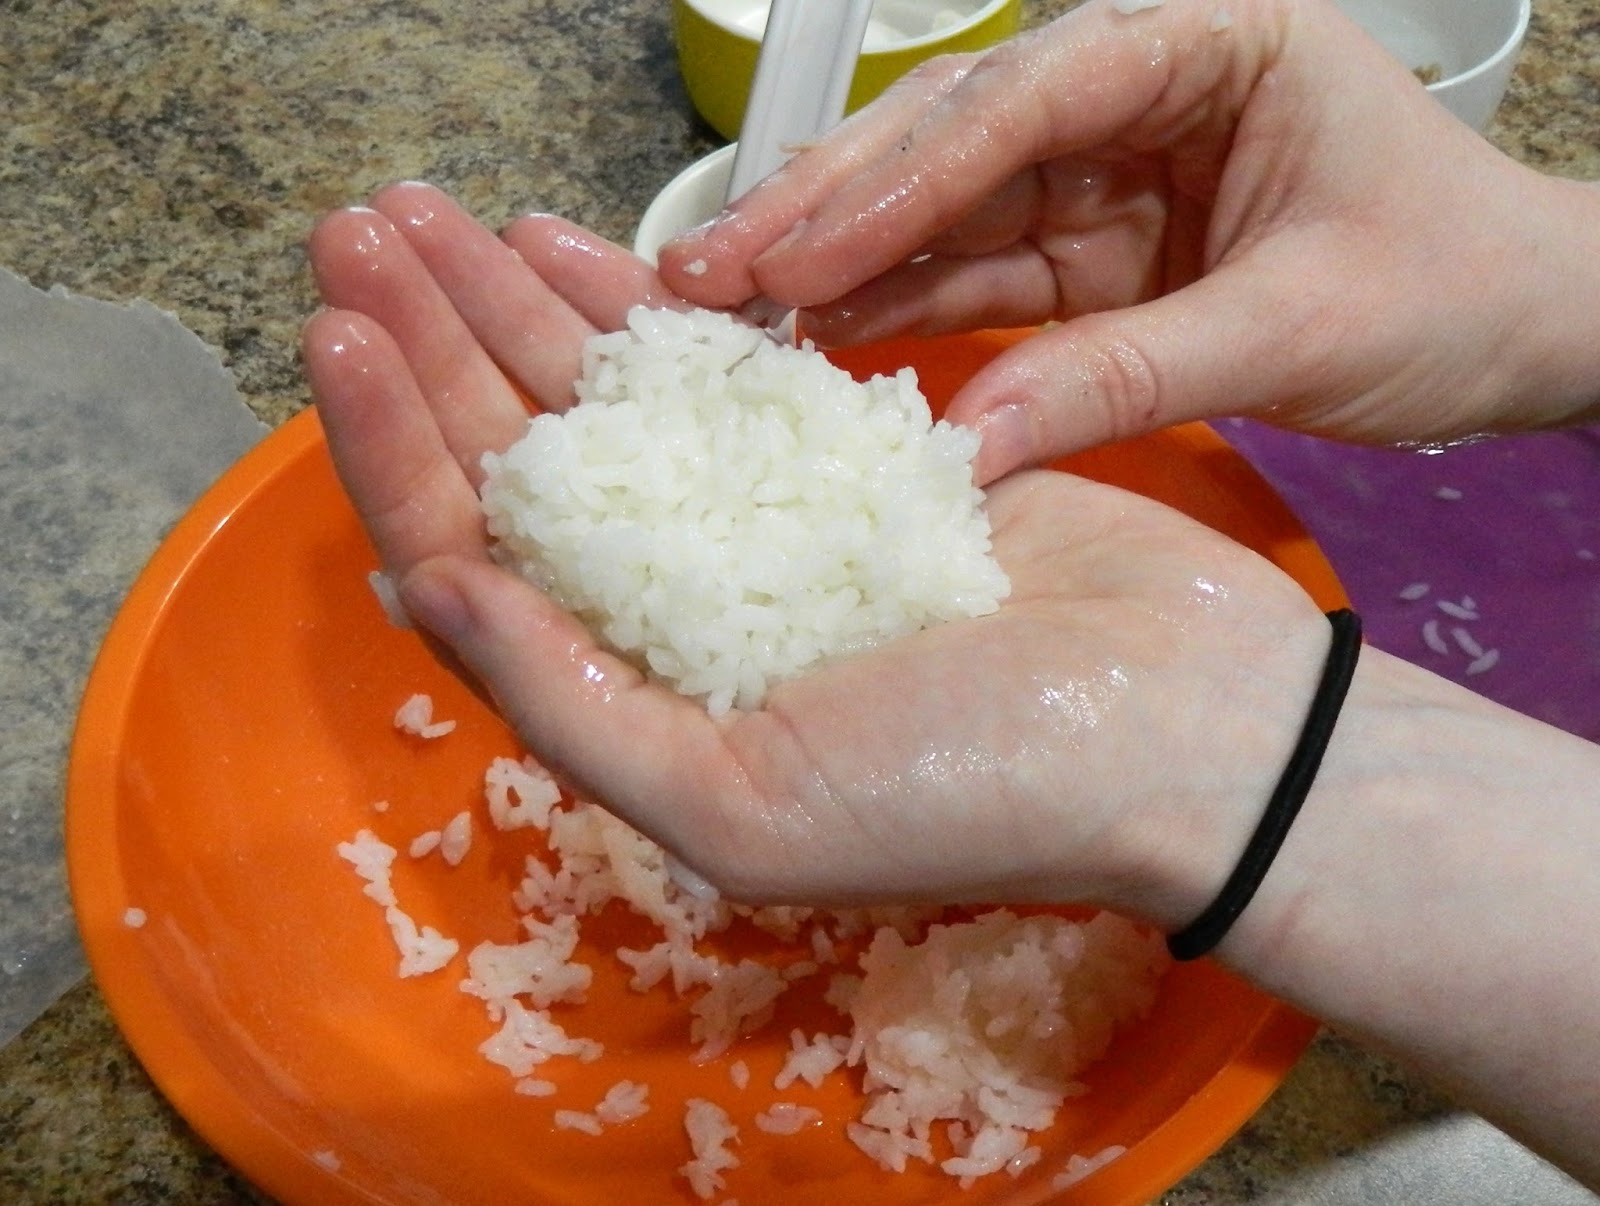


Next comes the filling. One recipe I read said to shape the rice ball first, then make a divot for the filling that is then covered with the strip of seaweed. The other said to just shape the ball around the filling. I tried both methods and liked the latter method better. I used about a teaspoon or two of fish for each onigiri.


Most onigiri I've seen are shaped like triangles. To do this, flatten one side against your palm while squeezing the other two sides with your other hand. Turn the triangle and repeat, pressing firmly, until you had a nice triangle shape. Be sure to press firmly enough; otherwise your ball will come apart after you put it down (I had one of mine try that on me... it was a shady little sucker.)


Once you have your rice triangle, grab a strip of seaweed and moisten one side in the salt water.


Then wrap it around one side of your triangle. After this, if desired, you can sprinkle some sesame seeds onto the onigiri (but I forgot this time. Dang.)


I ended up making 11 rice balls with the amount of rice I'd cooked. 

Onigiri really are a tasty little snack. It tastes quite similar to sushi (it IS made with pretty much the same ingredients!), and it's pretty healthy too. Have you ever made and/or eaten onigiri? If so, what are your favorite fillings? Let us know in the comments!

****UPDATE****
So, something highly amusing happened as I was preparing this blog post. My two young sons saw the picture of Brock at the top of this page and said, "Oh look!! It's Brock and the doughnuts!" I chuckled and told them I'd made those "doughnuts" and they were in the fridge. I then attempted to explain to them that the "doughnuts" were actually onigiri and were made of rice and fish... but they were too busy running to the fridge and getting into onigiri to pay any attention. The next thing I heard was, "Ewwww....". LOL. My kids are picky eaters, and I'm sure it was a shock to eat fish and rice instead of the doughnut you were expecting!


ONIGIRI (Japanese rice balls)


Makes 11-12 onigiri.
  • 1 cup medium grain rice
  • 2 cups water
  • Fillings: a packet of tuna or salmon, an ounce of cream cheese cut into small cubes, avocado chunks, crab meat, shredded carrots, umeboshi (pickled plums), cucumber chunks, etc., etc. Whatever you'd like!
  • Rice vinegar, if desired
  • A sheet of nori (seaweed), cut into 1" by 3" or 4" strips
  • A dash of salt and some water, for shaping the onigiri
  • Sesame seeds or Chinese five spice, for topping, if desired
Cook the rice in a rice cooker or on the stove top. Once it is cooked, let cool until you can handle it. Mix the rice with a little rice vinegar, if desired. Fill your palm with rice, press a teaspoon or two into the center, and form the ball around the filling. Using the palm of one hand and your fingers and palm of the other hand, shape the ball into a triangle, pressing firmly. Moisten a strip of seaweed and wrap it around one side of the triangle. Eat immediately or refrigerate. Onigiri will keep for a day or two, tightly covered. To prevent sticking, place them in layers of wax paper.


Saturday, January 14, 2017

Dr. Pepper Chocolate Cake, or, The Hazards of Lumps, Salt and Math in Cooking

I tried out a recipe I found on Pinterest, by Monica H. from Lick The Bowl Good, for Dr. Pepper Bundt cake. It combines three things I love, chocolate, Dr. Pepper, and cake, so it was definitely worth a try! I'd recently bought a six-pack of 16 oz bottles of Dr. Pepper because I needed some for another recipe I was making. I don't drink soda very often so it was nice to find another way to use up some of the soda.

It was a pretty simple cake to make, nothing complicated. I did find a few things to improve upon if I ever make the cake again, though. So to save you the trouble, I'll pass this knowledge on to you!!

First of all, the batter IS pretty lumpy when you mix the dry ingredients into the wet ingredients. However, you have to be sure not to stir too much, otherwise the cake will end up being tough. Kind of a catch-22 for me. When I sliced into the baked cake, there were lots of white spots where the dry ingredients did not get mixed into the batter. So I recommend sifting the dry ingredients into the batter; I imagine that would help ensure everything gets mixed up properly.

Secondly, the recipe I followed noted that the original recipe for the frosting makes a ton, and the baker ended up only using about half of the frosting on the cake. So I cut the recipe in half, and the amount turned out to be perfect to cover the whole cake. However, because I am, apparently, a total and complete GENIUS, I forgot to halve the amount of salt when mixing things up (I have a long and storied history of messing up with the salt in baking... it's my nemesis). When I tasted the frosting, I was all, HOLY SALT LICK, BATMAN! I do love salted chocolate, but this was a little too much. The recipe in this post will have the halved amounts for the frosting, so you don't end up with my salty frosting fate! You're welcome. :D

So, here's how it went:

First, spray a 10-inch Bundt pan with cooking spray with flour (or grease it with butter and then coat it with flour). Then, gather together the ingredients. To start, you'll need Dr. Pepper, butter, and cocoa powder.

Measure them out and put them into a saucepan over medium-high heat until the butter melts. 


(It looked kind of awesome when I poured the fizzy soda over the cocoa powder. ;P It reminded me of, like, lava or something).

Next, you'll need some brown sugar and granulated sugar. The recipe I used called for dark brown sugar, but I only had light brown sugar. So that's what I used!


Once the butter has melted in the Dr. Pepper mixture, remove it from the heat. Stir in the sugars till they dissolve, and then let it all cool for a little while. I poured it all into a large bowl at this point.


For your dry ingredients, you'll need flour, salt, and baking soda. Get them all mixed together. If I were you, I'd sift them together. I wish I had!!


Add two eggs to your cooled Dr. Pepper chocolate syrup of deliciousness, and mix well. 


Then gently fold the dry mixture into the wet ingredients. If I were to do this again, I'd try sifting it into the wet mixture. You don't want to over mix the batter, but I ended up with tons of large lumps that never mixed in completely. :( Pour your batter into the prepared Bundt pan.

(My batter was sadly, extremely lumpy. Don't let this happen to you!! :O )

Bake the cake in your 325 F oven for 35-40 minutes. Turn the pan halfway through baking time so it cooks evenly. My cake needed a few extra minutes to bake, so be sure to test it with a toothpick before taking it out of the oven- the toothpick should come out clean. Let the cake cool in the pan on a baking rack. Once cool, loosen the sides and turn the cake out onto your storage surface. 

Next: FROSTING! Gather thine ingredients:


I halved the recipe (but not the salt, much to my despair! Pay closer attention than I did!). First, melt the butter (the recipe said to soften it but I just melted it). The chocolate needs to be melted, too. I melted the butter most of the way, then added in the chocolate chips and melted it all down. That saved a bowl and the effort of scraping out melted chocolate. Add all of the frosting ingredients to a food processor (or a stand mixer; that's what I used. Or just dump it all into a bowl and use a hand mixer, or just a whisk! Whatever you have to get the job done). Mix everything until it turns into frosting, basically. :)


Frost the cake once it's completely cooled. The blog post/recipe I followed then topped the cake with round white sprinkles. It looked so cute. It made me think of the bubbles in soda. So I did the same thing. (The sprinkles didn't stick easily, though; a good number of them just rolled off and hit the floor. Grr.)


That's about all there is to it!


(My lumpy batter translated into white lumps in the cake. Sift, my friends, sift!!!)

This is a pretty tasty cake. It's extremely rich; you need to be a fan of dark chocolate or you may not like this much! Also, it doesn't taste anything like Dr. Pepper. Just to fully disclose everything :P. Whatever the case, with all the mess-ups, this cake did not turn out to be one of my best creations. It wasn't BAD.... in fact, both of my boys loved it and raved about it while eating. They're picky eaters, so I'll take the praise from them! I liked the piece I had too. The frosting was pretty salty (but eaten with the cake, it was a little better! A scoop of ice cream might help even more), and the lumps of flour and such looked bad but didn't affect the taste too badly. The cake was a little dryer and tougher than I'd like, but that might be because of overmixing (the batter really was absurdly lumpy, as I mentioned above!), and I made the cake the day before I made the frosting. If I'd frosted the cake earlier it may have sealed in more of the moisture. I was going to share some of this with neighbors, but I think now I won't. I don't want to share anything I'm not completely satisfied with!


If you try this recipe, let me know how it turned out! Let me know if sifting helped! :) And finally: beware of salt. That is all.

--Taylee


Here is the blog post and recipe I followed: 

THE RECIPE (WITH HALVED FROSTING INGREDIENT AMOUNTS):

Dr. Pepper Bundt Cake (adapted from Lick The Bowl Good)
  • 2 cups Dr. Pepper (not diet!)
  • 1 cup dark unsweetened cocoa powder
  • 1/2 cup unsalted butter (1 stick, cut into small pieces)
  • 1 1/4 cups granulated sugar
  • 1/2 cup firmly packed brown sugar
  • 2 cups flour (all-purpose)
  • 1 1/4 teaspoons baking soda
  • 1 teaspoon salt
  • 2 large eggs


Preheat the oven to 325 degrees Farenheit. Spray the inside of a 10-inch Bundt pan with cooking spray with flour (or grease it with butter and dust with flour).

Add the Dr. Pepper, cocoa powder, and butter chunks to a small saucepan and heat over medium-high heat until the butter has melted. Whisk in the sugars until dissolved. Pour the mixture into a large mixing bowl and let cool.

In a mixing bowl, sift the flour, baking soda, and salt.

In a small bowl, beat the eggs slightly. Mix them into the cooled chocolate mixture. Sift and fold the dry mixture into the wet mixture. Be careful not to over mix the batter! Pour the batter into the greased Bundt pan and bake at 325 F for 35-40 minutes. Rotate the pan halfway through the baking time to ensure even baking. The cake is done when a toothpick inserted into the cake comes out clean. Put the pan onto a cooling rack and allow the cake to cool completely.

Dr. Pepper Frosting:

  • 1 oz. dark chocolate, melted
  • 1/4 cup unsalted butter, melted
  • 1/2 teaspoon salt
  • 1/8 cup Dr. Pepper
  • 1/3 cup dark unsweetened cocoa powder
  • 1 1/4 cups powdered sugar

Mix all the ingredients until blended. Frost the cooled cake. Top with sprinkles, if desired.

Keep cake tightly covered!


Monday, January 9, 2017

Welcome!

Hello! Welcome to my blog. I am a stay-at-home mom, crafter, reader, baker, and general jack-of-all-trades. I love making things, and I love learning new skills. I love raising my little tribe, and I love building up and "feathering" my home and making it a cozy haven for my husband, children, pets, and myself. In addition to my own experiences, I've learned lots of great things from other bloggers and Pinterest, and I've decided to document the best things I discover in blog of my own. My blog is named "Feathering Our Nest" because that's what I see myself doing as I go through my life: learning, growing, and making my home and my life cozier, richer, and better: "adding feathers to my nest", if you will. I'd love to inspire others to create and grow! Here you'll find a bit of everything: craft tutorials, recipes, book reviews, funny experiences in my life, as well as plenty of other good randomness. I want to make this a happy place full of fun! I hope you enjoy reading, and hopefully discover something to enrich your own life.

--Taylee